wordpress background

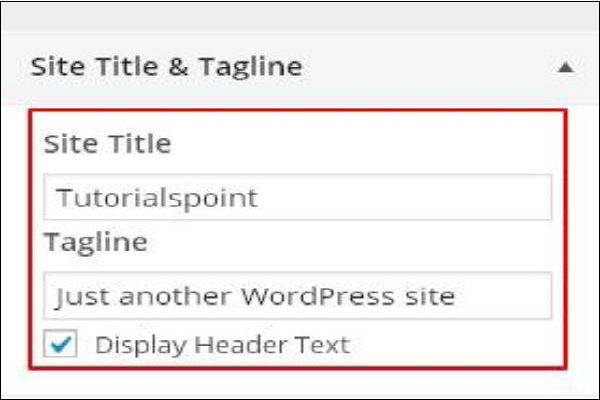
In this chapter, we will study about background images, background colors and background opacity.
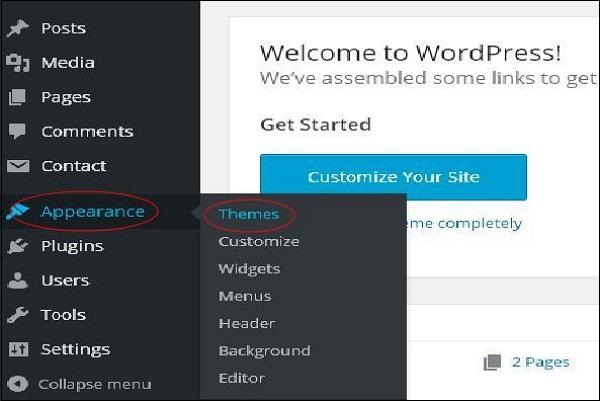
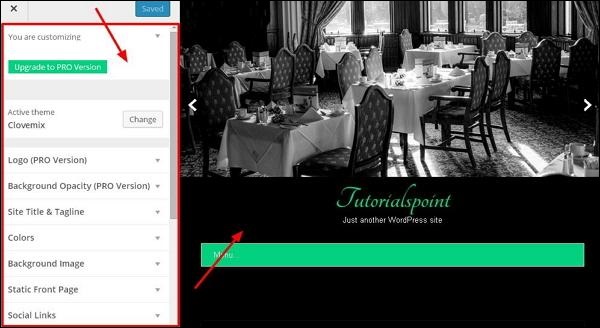
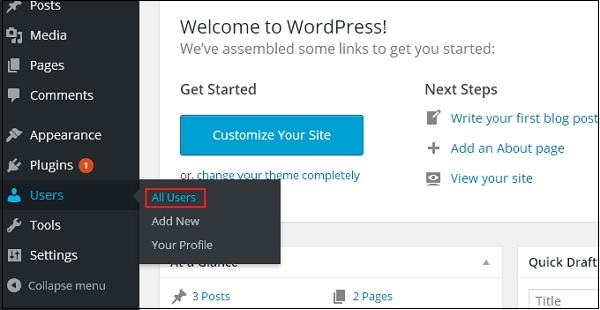
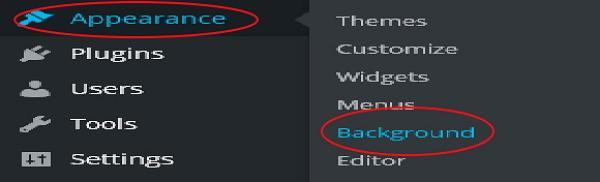
Step (1) − Click on Appearance → Background.

WordPress Background

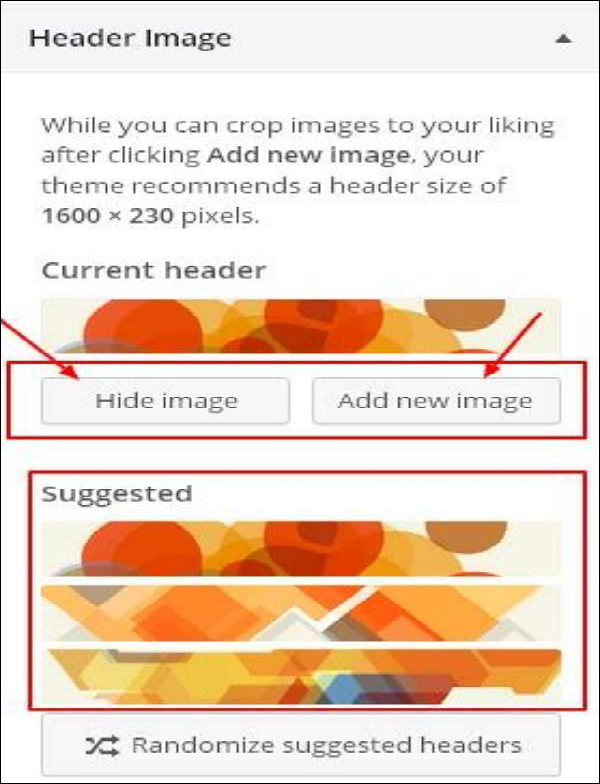
Step (2) − The following page appears where the Background Image section shows up.

WordPress Background

Step (3) − There’s no image selected for background. If you want to do so, then click on Select Image. You get the following page.

WordPress Background

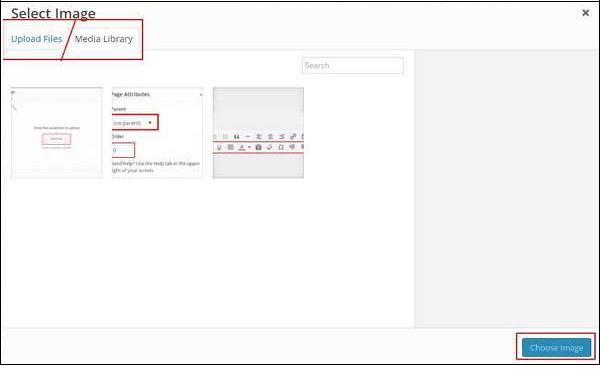
Here you can upload images using two options.
  • Upload Files
  • Media Library
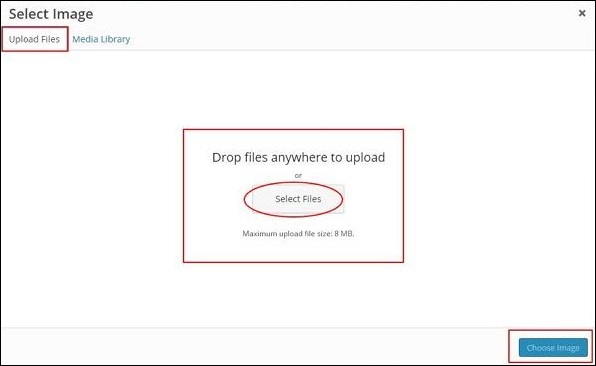
Step (4) − Upload Files − When you click on Upload files the following screen is displayed. Select files from your desktop and then click on Choose Image if satisfied with the image.

WordPress Background

Step (5) − Media Library − When you click on Media Library the following page appears. Select files from the WordPress media library, which means, if you already have images updated then you can select any of them directly.

WordPress Background

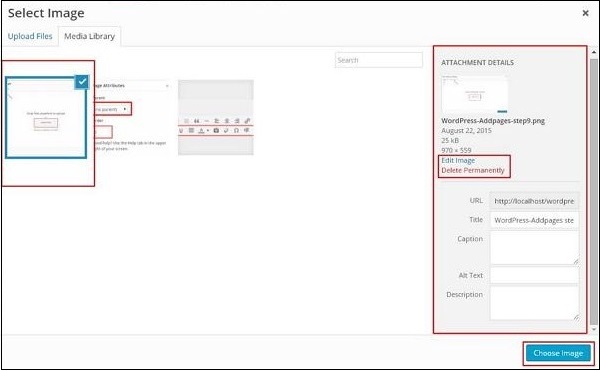
After selecting an image, on the right side you will get a few options −
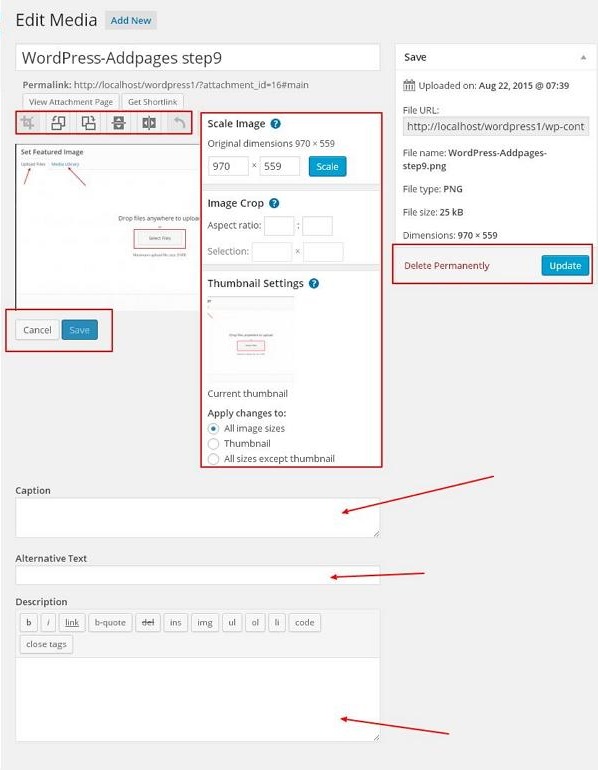
  • Edit Image − When you click on this you are taken to another page where you can edit the scale image, dimensions, crop image, and thumbnail settings, etc. As shown in the following image, make the required changes, click on Save and then click on Update.

WordPress Background

  • Delete Permanently − If you want your image off the library then click on this button.
  • URL − Enter your image URL into this box.
  • Title − If you want to make any changes in the title of the image you can do it right here.
  • Caption − You can explain briefly about your image in this section.
  • Alt text − Give an alternative text to your image so that it is easily available for the users during search.
  • Description − A little description about your image.
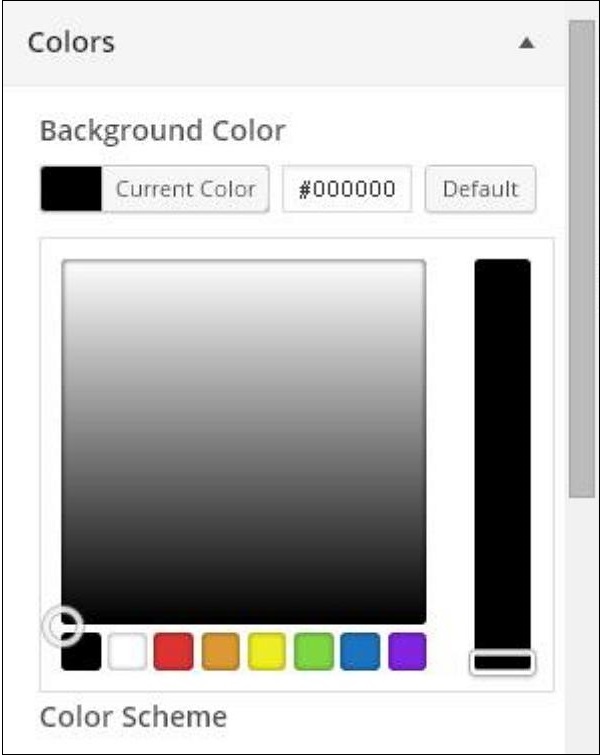
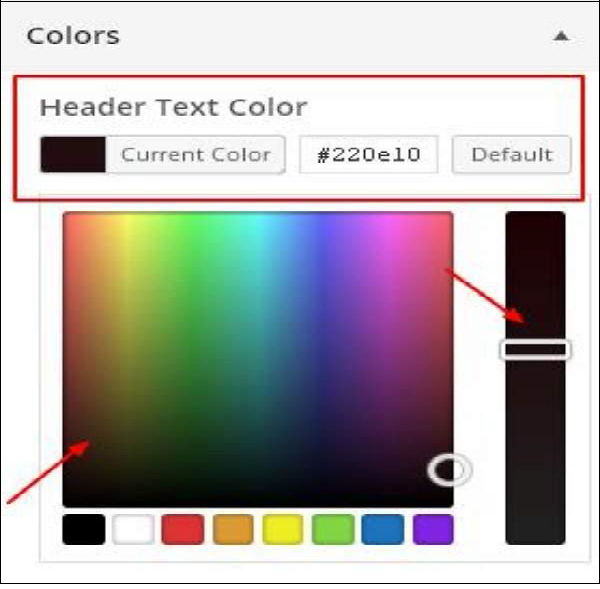
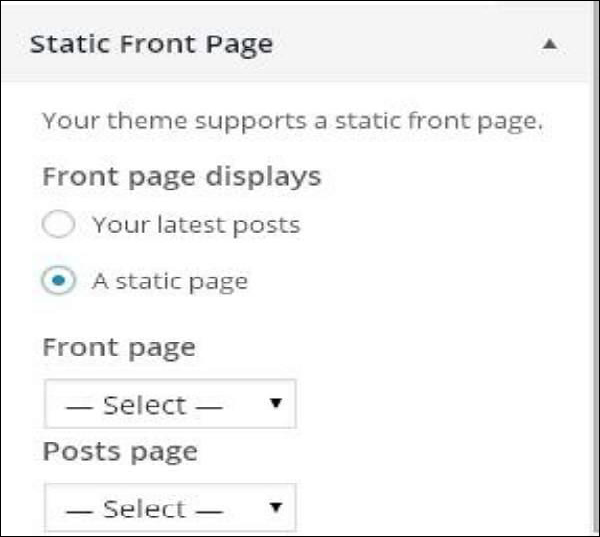
Step (6) − Click on Colors → Background Color on the same page. Change your background color accordingly. Background Opacity is not used for all themes. Theme customization is not same for every theme we use. It changes from theme to theme.

WordPress Background


                                  <<<   Back to WordPress Home

wordpress widget management

In this chapter, we will study about Widget Management. Widgets are small blocks that perform specific functions. These give design and structure control to the WordPress theme. Some specific features of a widget are −
  • They help you add content and features.
  • They can be easily dragged and dropped in widget area.
  • They vary from theme to theme. They are not same for every theme.
Step (1) − Click on Appearance → Widgets.

WordPress Widget Management

Step (2) − The following screen showing available widgets appear.

WordPress Widget Management

The following functions appear on the page −
  • Available Widgets − You can use these to add into your sidebar main.
  • Inactive Sidebar (not used) − These are not used and can be removed permanently from the widget list.
  • Inactive Widgets − Removes the widgets from sidebar but keep it in the settings.
  • Sidebar Main − Any widget you add here will appear on your site.
  • Manage in Customizer − Takes you back to customization page.

WordPress Widget Management

WordPress Widget Management

Step (3) − Drag and drop in the Sidebar Main. Any widget you add here, shows up on your site.

WordPress Widget Management

               
                                          <<<   Back to WordPress Home

wordpress customize theme

In this chapter, we will learn how to customize themes. Customizing themes help you to give a new look to your website. Here you can change background images/colors, add titles, and do much more.
Following are the steps of Customize theme.
Step (1) − Click on Appearance → Customize.

WordPress Customize Theme

Step (2) − The following screen will be displayed.

WordPress Customize Theme

As can be seen, on the left side we have the customizing section, and on the right side we have the theme you have chosen. So any changes you make on the left side will be displayed on the right side of the page. Here are a few options you must know −
Active theme − In this section, you can change the current theme just by clicking on ‘Change’.

WordPress Customize Theme

When you click on ‘Change’ you get a list of themes, click on any of the themes, and then click ‘Save & Continue’. Your theme will be saved.

WordPress Customize Theme

Site Title & Tagline − In this section, you can add the site title and tagline you want to add to your website.

WordPress Customize Theme

Add your title name in the ‘Site Title’ section. And your tagline in the ‘Tagline’ box.
Colors − You can change your header text color using this section. As you scroll through the colors you find changes happening on the right side of your page. You can even add a color of your own into the box that is situated in between ‘Current color’ and ‘Default’.

WordPress Customize Theme

Header Image − Add a header image either by selecting from the suggestions or you can add an image of your own by clicking on ‘Add new image’.

WordPress Customize Theme

Widgets − Add widgets to your site from here.

WordPress Customize Theme

When you click on the arrow mark the following image appears.

WordPress Customize Theme

Here, there are two options −
First is the ‘Main Widget Area’, when you click on this you get another list of widgets that are to be displayed in the footer area.

WordPress Customize Theme

When you click on any of the widgets a dropdown appears where you can edit more or add more. For example − If you want to add categories then the following image appears.

WordPress Customize Theme

In this image, as you can see, you can add your category in the ‘Title’ section. Check any of the required boxes. If you do not want to add any, then say ‘Remove’. Same goes for other widgets too.
Secondary Widget − Here you must click on ‘Add a widget’and you get a side bar with a list of different widgets. Click on any and it adds up to your widget list.

WordPress Customize Theme

If you want to add more widgets then click on ‘Add a widget’again and you can add as many widgets as you want.

WordPress Customize Theme

Static Front − Select either latest posts or static front page for your site.

WordPress Customize Theme


                                  <<<   Back to WordPress Home

wordpress theme management

In this chapter, we will learn about Theme management. It includes image files, templates, CSS stylesheets, etc. that can help to make your website look great. This chapter discusses how to install, add new, or customize themes in WordPress.
Following are the steps for Theme Management.
Step (1) − Select Appearance → Themes from the dashboard.

WordPress Theme Manegement

Step (2) − The following screen will be displayed. Hover over any theme and click on Theme Details.

WordPress Theme Management

WordPress Theme Management

Step (3) − When you click on Theme Detail the following page appears. It consists of details related to the theme. Details like version, description, tags etc.

WordPress Theme Management

If you want to add this theme to your page/website then click on Activate, and if you want to just check the theme, then click on Live preview.
If you click on activate then you get a pop-up message as −

WordPress Theme Management

Step (4) − Click on Customize.

WordPress Theme Management

Step (5) − On the left side of the page, you can customize your theme. Any changes you make or anything new you add is displayed on the right side of the page.

WordPress Theme Management

We will learn about customizing the appearance of the themes in the next chapter i.e.; WordPress Customize Theme.


                                                      <<<   Back to WordPress Home

wordpress personal profile

In this chapter, we will learn how to create a Personal profile in WordPress.
Following are the steps to Personal Profile.
Step(1) − Click on Users → Your Profile from the left navigation bar.

WordPress Personal Profile

Step (2) − When you click on ‘Your profile’ the following screen will be displayed.

WordPress Personal Profile

The following Personal options appear on the screen −
  • Visual editor − While you are adding posts/pages to your site you can enable this setting if you wish to create, format, or edit your post. If you disable this setting, you won’t be able to use this option.
  • Admin color scheme − You can change the color of your WordPress site by selecting any of the following.
  • Keyboard Shortcuts − If you are too fast at getting your work done and need keyboard shortcuts then you can check this box.
  • Toolbar − If you check this box, you can view the toolbar while using WordPress.
Name
  • Username − Enter your user name.
  • First Name/ Last Name − Enter your first name and last name.
  • Nick name − Enter nick names if any.
  • Display name publicly as − Check the box if you want your name to be displayed publicly.
Contact Info
  • E-mail − Enter a valid e-mail address.
  • Website − Type in your web address.
About yourself
  • Biographical Info − Some details about you.
  • New password − Enter a password of your choice.
  • Repeat password − Re-enter the password for authentication. Password must contain 7 characters.
  • Your photo − You can upload an image of your own from your computer. This will be your profile picture.
Step (3) − After you have updated all the changes, click on Update Profile.

                                     <<<   Back to WordPress Home

wordpress delete users

In this chapter, we will learn how to delete users in WordPress.
Following are the steps to Delete Users.
Step (1) − Click on Users → All Users.

WordPress Delete User

Step (2) − List of Users gets displayed as shown in the following screen.

WordPress Delete User

Step (3) − Select the one you want to delete. And click on Delete.

WordPress Delete Pages

Step (4) − When you click on Delete you get the following page.

WordPress delete User

Step (5) − Select options as required and click on Confirm Deletion. Your user will be deleted.
Step (6) − We have another method of deleting users. A screen as shown in the following shot appears.
Here you can select the users to delete, check the boxes and click on Delete from the dropdown list and click on Apply.
Step (7) − Once you click on Apply, the users selected will be deleted.

WordPress Delete User


                                             <<<   Back to WordPress Home

wordpress edit users

In this chapter, we will study how to Edit Users in WordPress.
Following are the simple steps to Edit Users in WordPress.
Step (1) − Click on Users → All Users.

WordPress Edit Users

Step (2) − You will see a list of users.

WordPress Edit Users

There are two more tabs seen on the toolbar −
  • Administrator − List of administrators will be displayed.
  • Subscriber − List of subscribers will be displayed.
When we click on the Change role to box, a dropdown list appears as seen in the preceding screenshot.
  • Subscriber − A person who can only manage his profile.
  • Contributor − A person who can write and supervise own posts, but cannot publish them.
  • Author − A person who can publish and manage his own posts.
  • Editor − A person who can publish and manage posts, including the posts of other users.
  • Administrator − A person who has access to all the administration features within a single website.
Click on the check box of the user name to change the role of the user. Then, click on change button and the user’s role will be changed accordingly.
Step (3) − Click on Edit option as shown in the following screen to edit the user.

WordPress Edit Users

Step (4) − The Edit User page is displayed. Here you can edit or modify all the fields as per your need and click on Update User to save the changes.

WordPress Edit Users


                                                   <<<   Back to WordPress Home

wordpress user photo

In this chapter, we will study about User Photo in WordPress. To add user photo in WordPress, you must install plugin User Photo from WordPress plugins. It helps you add a photo of your own to your WordPress profile.
Following are the simple steps to add a User photo.
Step (1) − Click on Settings → User Photo.

WordPress User Photo

Step (2) − The User Photo Options page gets displayed.

WordPress User Photo

Set the dimension for your thumbnails and make the required changes and then click on Update Options button.
Step (3) − To view the plugin User Photo is activated, go to Users → Your Profile. In your Profile page you can see Your Photo section is added. Here you can upload your photo to display as profile image.

WordPress User Photo


                                     <<<   Back to WordPress Home

wordpress add users

In this chapter, we will study how to Add users to your WordPress blog or website. When users register on your WordPress blog or website, you get an e-mail notification, so you always know when new users register, and you can then get into your Dashboard and edit the users’ role.
Following are the simple steps to Add Users in WordPress.
Step (1) − Click on Users → Add New in WordPress.

WordPress Add Users

Step (2) − You can fill the user detail on the Add New Userpage. Fill in all the required fields (as seen in the following screen) to proceed further.

WordPress Add Users

  • Username (required) − Enter the unique username, which you want to display on website.
  • E-mail (required) − Enter the valid e-mail address. The user receives notifications from the site at this e-mail address.
  • First Name − Enter the user’s first name.
  • Last Name − Enter the user’s last name.
  • Website − Enter the URL for the user’s website.
  • Password (required) − Enter the password.
  • Repeat Password (required) − Repeat the same password as the previous password for authentication.
  • Send Password − Send password to the New User by e-mail checkbox. The user will receive an e-mail with the new password.
  • Role − Select the particular role from the dropdown, i.e., Subscriber, Contributor, Author, Editor, or Administrator.
Click on Add New User button to add user to your users list.
Step (3) − You can view the user list to see whether the users have been added. A message will be displayed as New User Created as seen in the following screen.

WordPress Add Users

          
                                    <<<   Back to WordPress Home

wordpress user roles

In this chapter, we will learn about the roles of users in WordPress. Every user has their own role in WordPress. Roles are like permissions given to a particular user to access the WordPress site. These roles can be allotted only by the Admin.
Here are few pre-defined roles available in WordPress −
  • Administrator − The Administrator has all the rights. An Admin can do anything and everything on the WordPress site such as creating more admins, inviting more users and also removing them.
  • Editor − The Editor has access to all the posts, pages, comments, categories, tags, and links. They can create, publish, edit or delete any posts or pages.
  • Author − The Author can only write posts, upload pictures, edit, and publish their own posts.
  • Contributor − The Contributor can only write and edit their posts until published. They can create their own posts and pages but cannot publish them. They cannot upload images or files but can see your site’s status. When they want to publish any post, it must be first notified personally to the administrator for review. When the post is approved, the contributor cannot make any changes once published.
  • Follower − The Follower can only read and comment on the posts. Followers are the ones who have signed in to your account to receive updates.
  • Viewer − Viewers can only view your posts; they cannot edit but can only comment on the posts.

                                              <<<   Back to WordPress Home